ECON 4370 / 6370 Computing for Economics
Lecture 4: Version Control with Git
This set of notes is based on Grant McDermott’s lecture notes on version control with Git and GitHub.
Introduction
This lecture covers version control with Git and GitHub, essential tools for modern data science and research workflows. We’ll learn how to track changes, collaborate with others, and maintain organized project histories.
Learning Objectives
By the end of this lecture, you will be able to:
- Understand the purpose and benefits of version control
- Set up Git repositories and connect them to GitHub
- Perform basic Git operations (add, commit, push, pull)
- Handle merge conflicts
- Work with branches and pull requests
- Use Git effectively in your research projects
Why Version Control?
The Problem
Anyone who has worked on a project has experienced this scenario: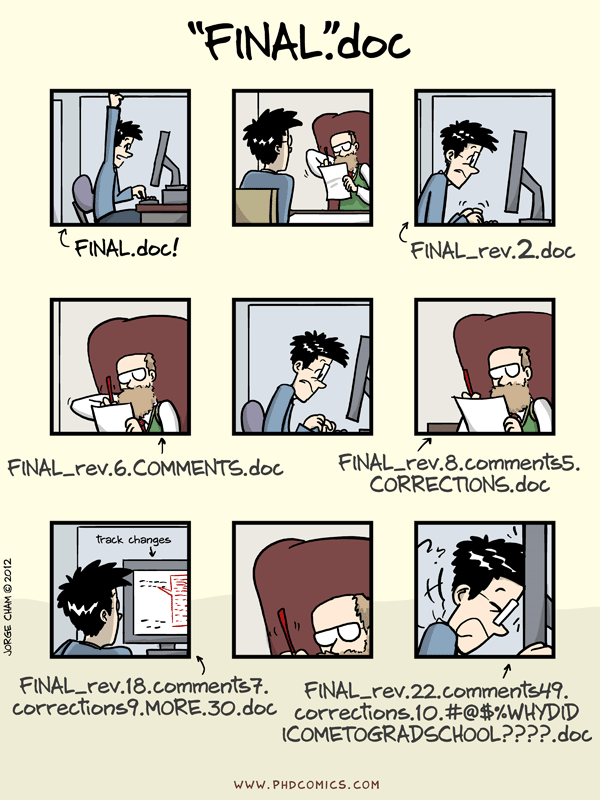
Multiple versions of files with unclear names, uncertainty about which version is current, and the fear of losing work when making changes.
You need a version control system (VCS) to track changes to your files.
As the name implies, these tools help maintain a history of changes; furthermore, they facilitate collaboration. VCSs track changes to a folder and its contents in a series of snapshots, where each snapshot encapsulates the entire state of files/folders within a top-level directory. VCSs also maintain metadata like who created each snapshot, messages associated with each snapshot, and so on.
Why is version control useful? Even when you’re working by yourself, it can let you look at old snapshots of a project, keep a log of why certain changes were made, work on parallel branches of development, and much more. When working with others, it’s an invaluable tool for seeing what other people have changed, as well as resolving conflicts in concurrent development.
Modern VCSs also let you easily (and often automatically) answer questions like:
- Who wrote this module?
- When was this particular line of this particular file edited? By whom? Why was it edited?
- Over the last 1000 revisions, when/why did a particular unit test stop working?
The Solution: Git and GitHub
Git
Git is a distributed version control system that solves these problems:
- Version Control: Track all changes to your files over time
- Collaboration: Multiple people can work on the same project simultaneously
- Backup: Your work is safely stored and can be recovered
- History: See exactly what changed, when, and why
Think of Git as if Dropbox and the “Track changes” feature in MS Word had a baby. It’s even better because Git is optimized for the things that economists and data scientists work on (code, data analysis, documentation).
To be further motivated, please refer to git vs. Dropbox from a researcher’s perspective by Michael Stepner.
GitHub
GitHub is an online hosting platform that provides services built on top of Git:
- Cloud Storage: Your repositories are stored online
- Collaboration Tools: Issues, pull requests, wikis
- Social Features: Follow projects, star repositories
- Integration: Works seamlessly with RStudio and other tools
Just like we don’t need RStudio to run R code, we don’t need GitHub to use Git… but it makes our lives much easier.
Git(Hub) for Scientific Research
From Software Development to Research
Git and GitHub’s role in global software development is well-established. There’s a high probability that your favorite app, program, or package is built using Git-based tools (RStudio is a case in point).
Scientists and academic researchers are increasingly adopting these tools:
- Open Science: Git(Hub) helps operationalize the ideals of open science and reproducibility
- Journal Requirements: Many journals have strict requirements regarding reproducibility and data access
- Research Workflow: Host code, data, and documentation for papers
- Collaboration: Work with co-authors and research teams
Nature article: “Democratic databases: science on GitHub” (Perkel, 2016).
Getting Started with Git and GitHub
Prerequisites
Before we start, make sure you have:
☑ Installed R
☑ Installed RStudio
☑ Installed Git
☑ Created an account on GitHub
If you need help with installation, consult Jenny Bryan’s excellent guide: Happy Git with R.
Git(Hub) + RStudio Integration
One of RStudio’s great features is how well it integrates version control into your everyday workflow. Even though Git is a completely separate program from R, they feel like part of the same “thing” in RStudio.
This integration greatly reduces the cognitive overhead associated with traditional workflows where you have to juggle multiple programs and languages simultaneously.
SourceTree and GitKraken are two popular Git GUIs.
Setting Up Your First Repository
Link a GitHub Repository to an RStudio Project
The starting point for our workflow is to link a GitHub repository to an RStudio Project. Here are the steps:
- Create the repo on GitHub and initialize with a README
- Copy the HTTPS/SSH link (the green “Clone or Download” button)
- Open RStudio
- Navigate to File → New Project → Version Control → Git
- Paste your copied link into the “Repository URL:” box
- Choose the project path and click Create Project
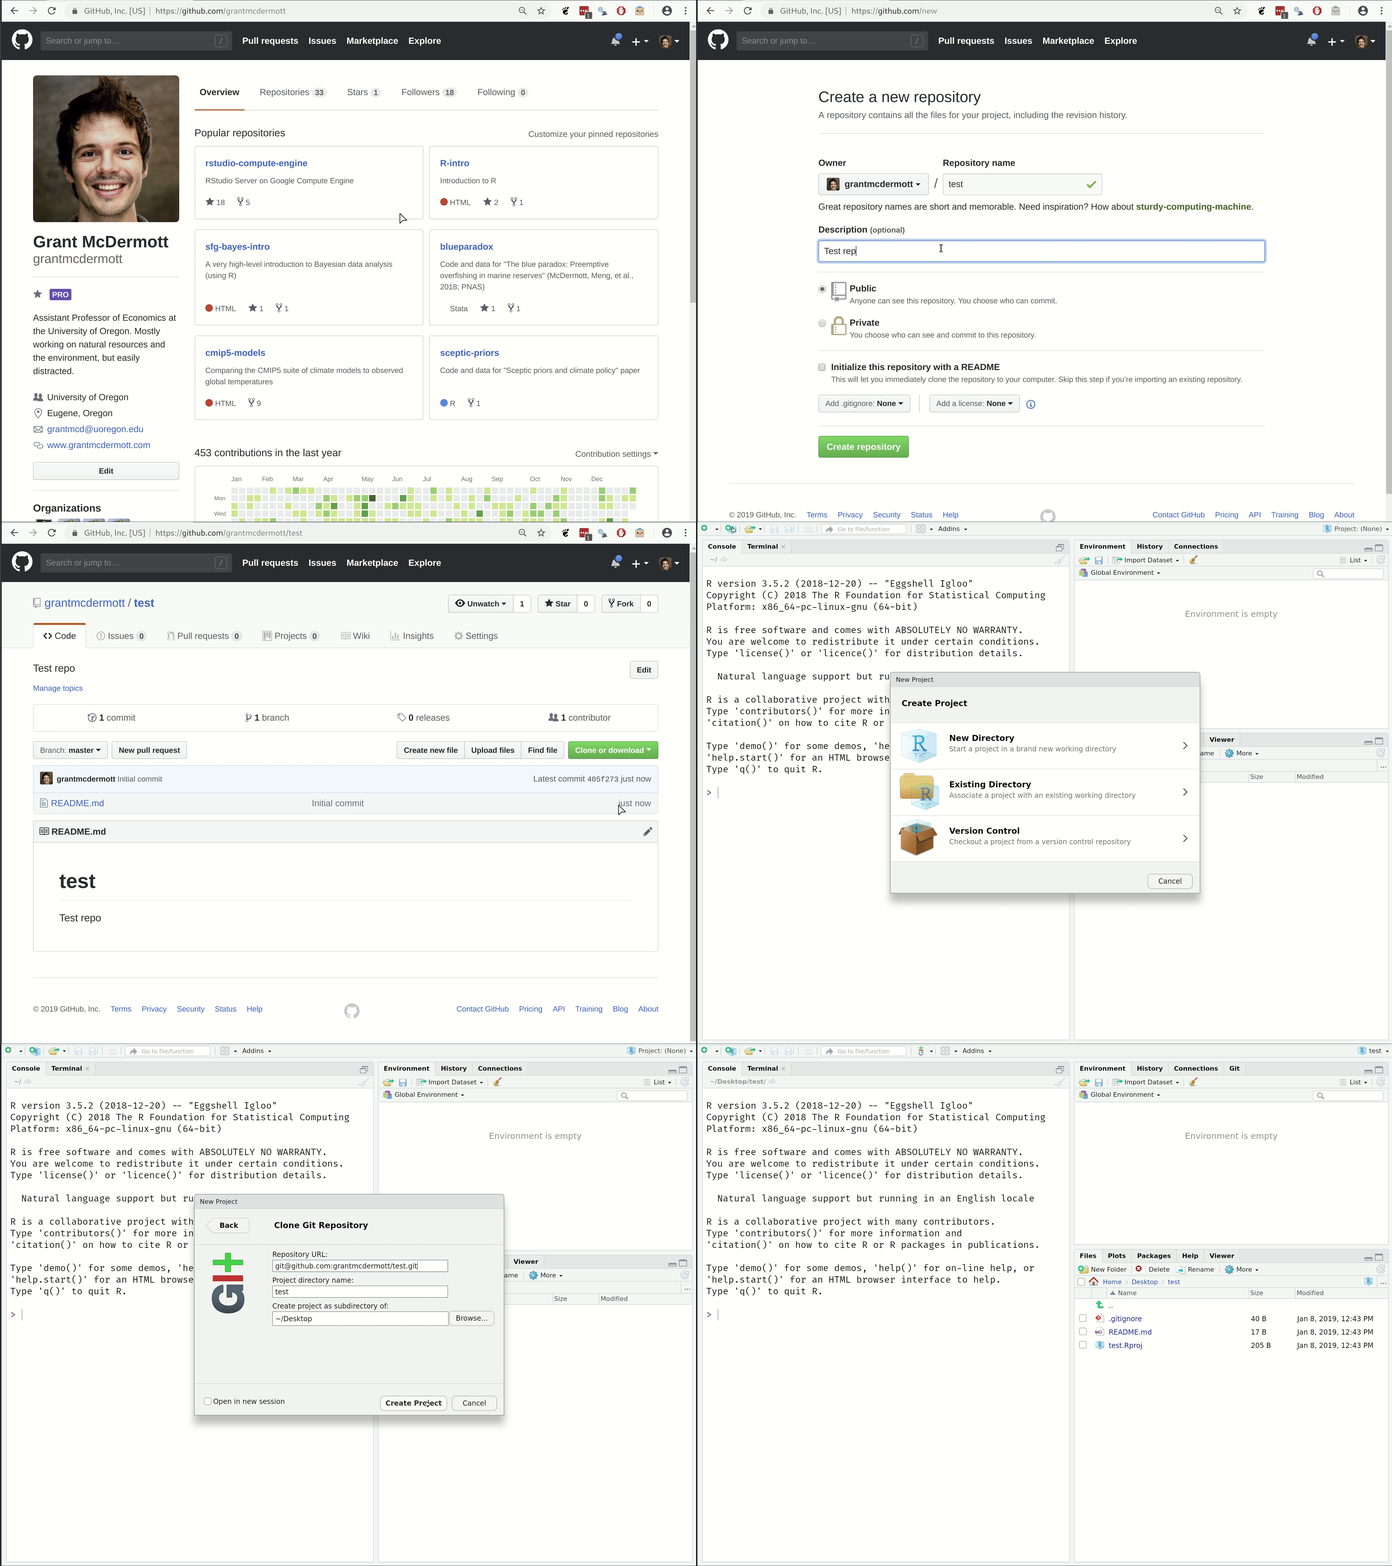
It’s easiest to start with HTTPS, but SSH is advised for more advanced users.
Making Local Changes
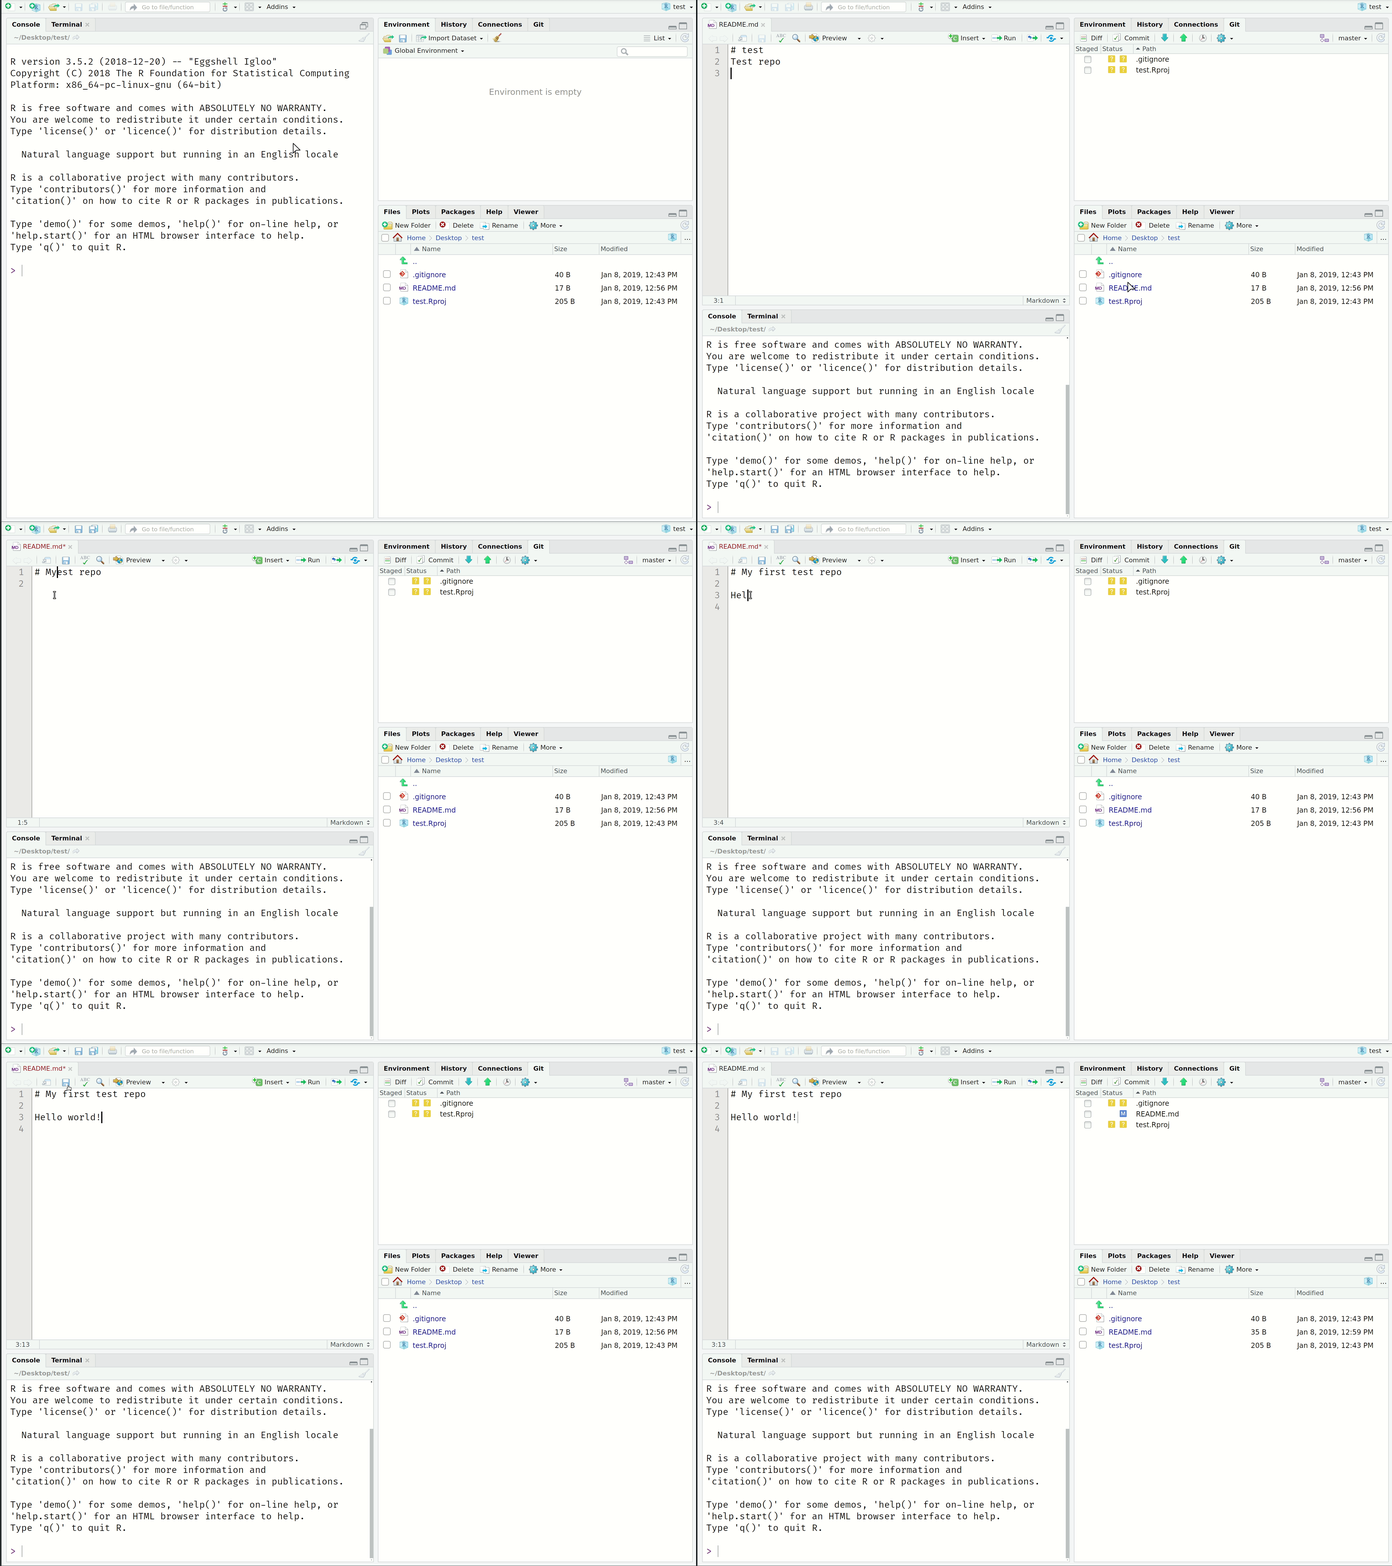
Once you’ve cloned your repository, you can start making changes:
- Look at the top-right panel in RStudio for the “Git” tab
- Open the README file (in the “Files” tab in the bottom-right panel)
- Add some text like “Hello World!” and save the file
- Notice the changes appear in the “Git” panel
Main Git Operations
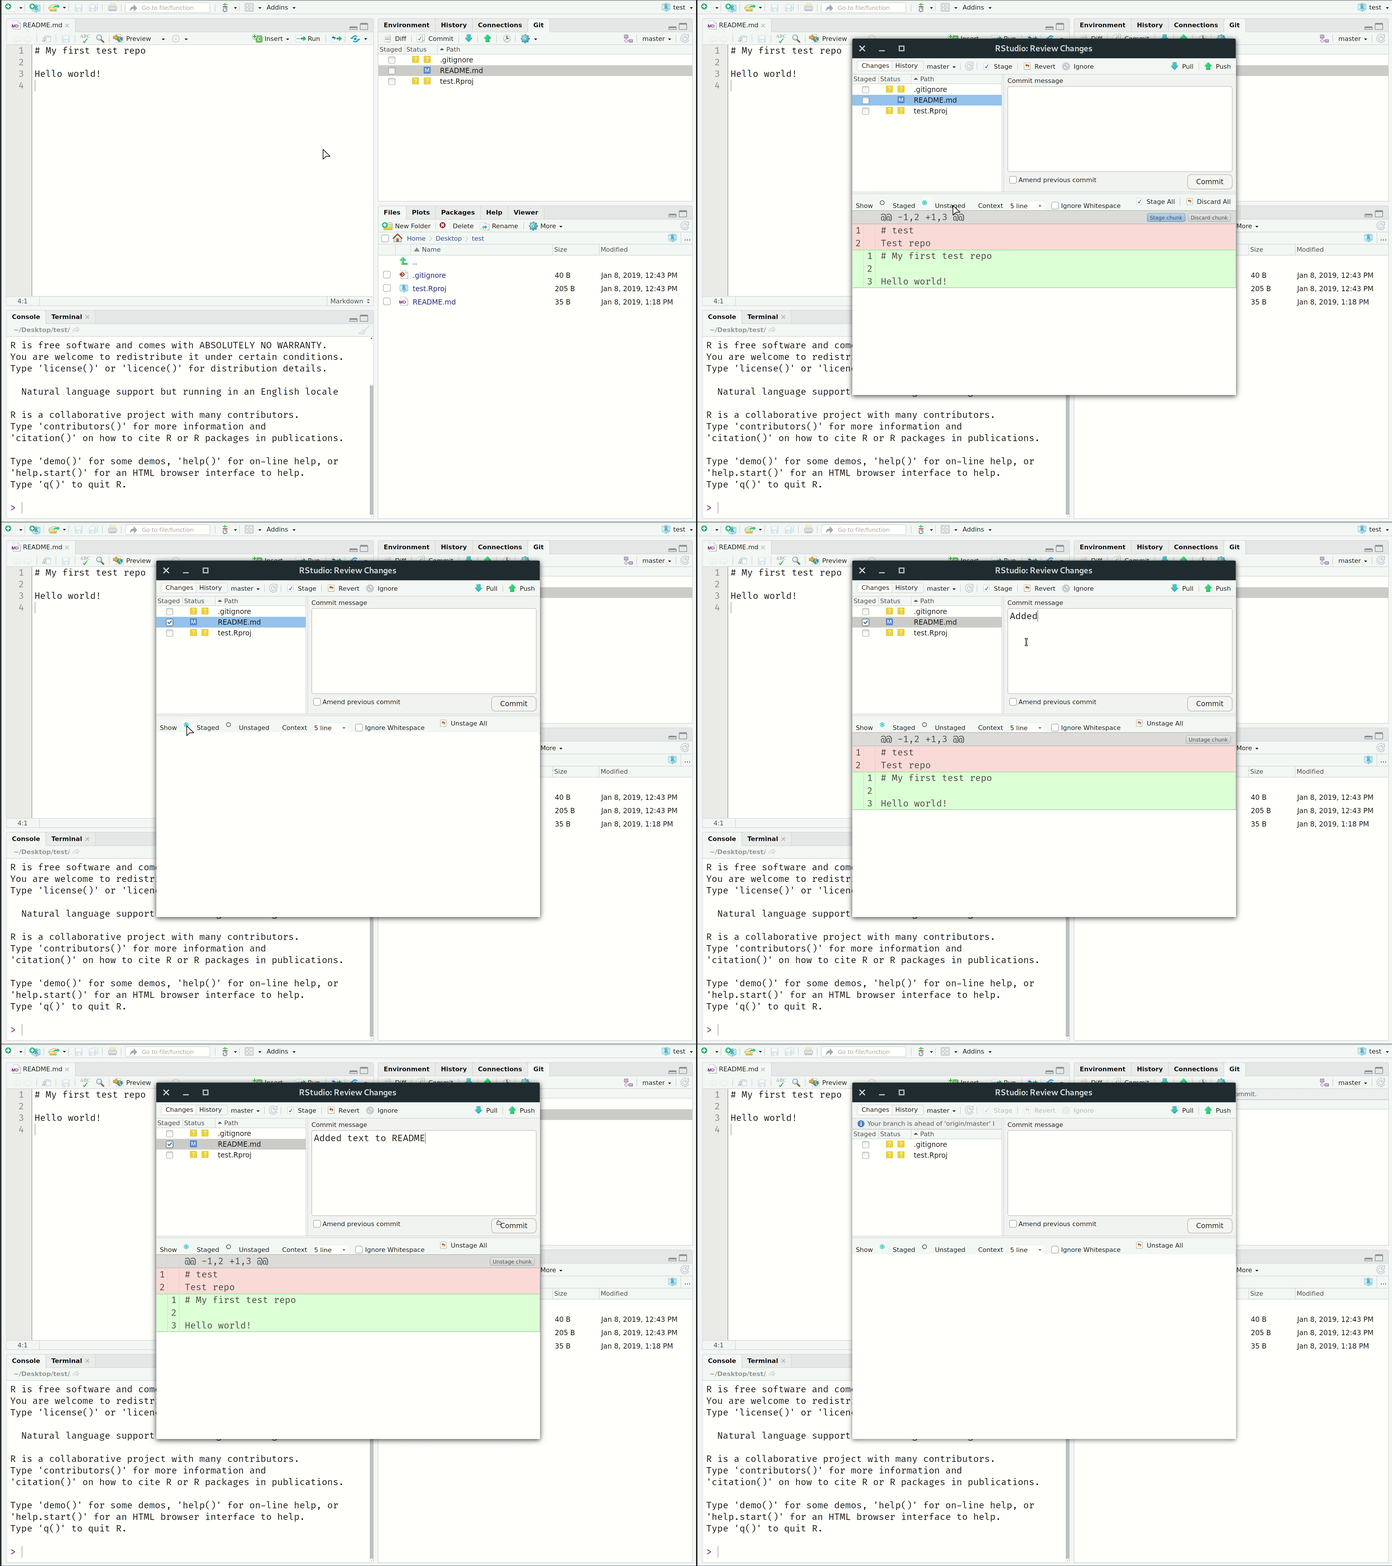
Now that you’ve cloned your first repo and made some local changes, it’s time to learn the four main Git operations:
1. Stage (or “Add”)
Tell Git that you want to add changes to the repo history (file edits, additions, deletions, etc.).
2. Commit
Tell Git that, yes, you are sure these changes should be part of the repo history.
3. Pull
Get any new changes made on the GitHub repo (i.e., the upstream remote), either by your collaborators or you on another machine.
4. Push
Push any (committed) local changes to the GitHub repo.
Visual Workflow
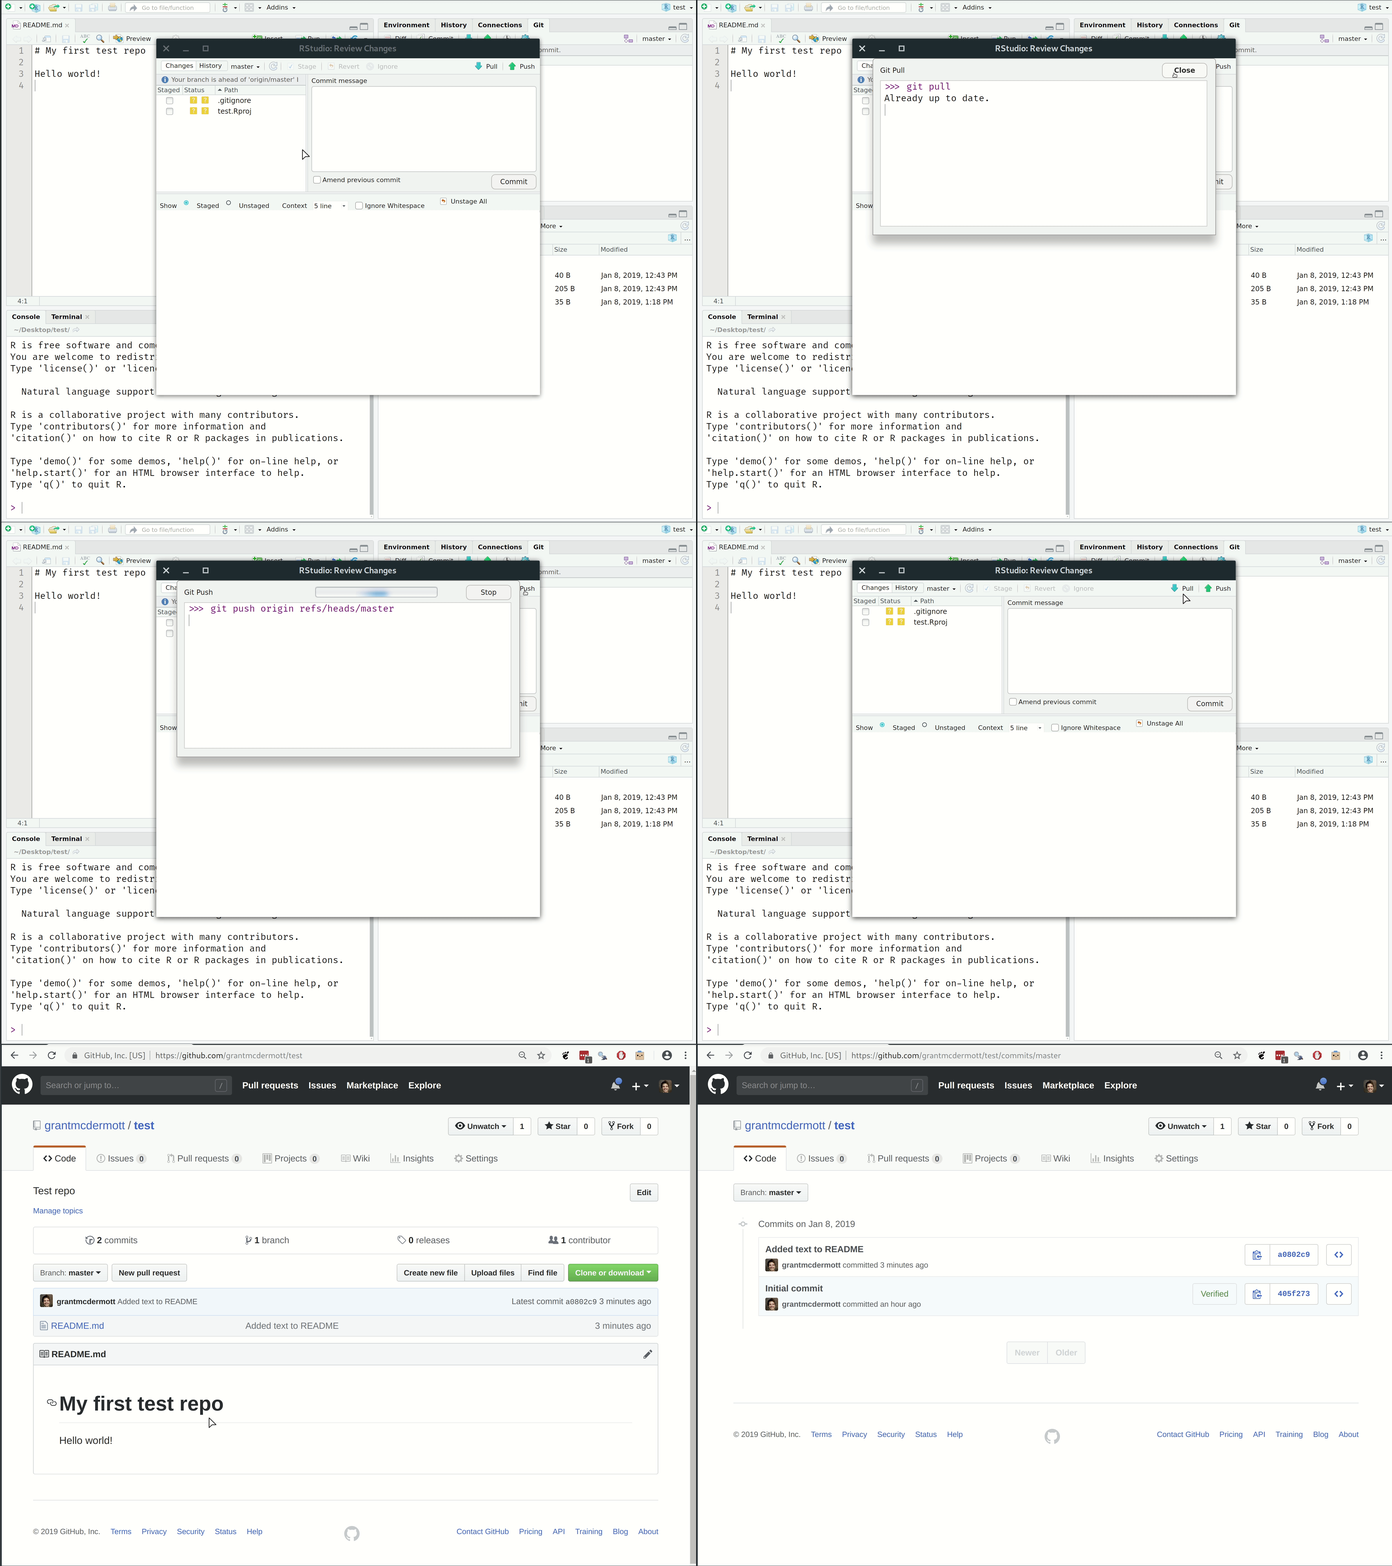
Step-by-Step Summary
Here’s what we just did:
- Made some changes to a file and saved them locally
- Staged these local changes
- Committed these local changes to our Git history with a helpful message
- Pulled from the GitHub repo (good practice, even on solo projects)
- Pushed our changes to the GitHub repo
Always pull from the upstream repo before you push any changes. Seriously, do this even on solo projects; making it a habit will save you headaches down the road.
Why This Workflow?
Creating the repo on GitHub first means that it will always be “upstream” of your (and any other) local copies. This allows GitHub to act as the central node in the distributed version control network.
This is especially valuable when collaborating on projects with others, but also has advantages when working alone.
RStudio Projects are excellent because they: - Interact seamlessly with Git(Hub) - Solve absolute vs. relative path problems (the .Rproj file acts as an anchor point)
Git from the Shell
While RStudio’s Git integration is ideal for new users, understanding shell commands helps you internalize the basics and provides more power and flexibility.
Main Git Shell Commands
Basic Operations
Clone a repository:
$ git clone REPOSITORY-URLSee the commit history:
$ git logCheck what has changed:
$ git statusStaging Files
Stage a specific file or folder:
$ git add NAME-OF-FILE-OR-FOLDERStage all files:
$ git add -AStage updated files only (modified or deleted, but not new):
$ git add -uStage new files only (not updated):
$ git add .Committing and Syncing
Commit your changes:
$ git commit -m "Helpful message"Pull from the upstream repository:
$ git pullPush local changes to the upstream repo:
$ git pushOther
- displays historical commits stored chronologically in the repository.
$ git log- visualizes history as a DAG
$ git log --all --graph --decorate- add a tag
$ git tag -a v1.0 -m 'message' [optional:commit-id]- remove
$ git rm --cached filenameEraser-like features
The latest commit is called HEAD commit
- displays view the HEAD commit.
$ git show HEAD- restore the file in the working directory to what you made in last commit.
$ git checkout HEAD filename- unstages the file from committing in the staging area. This command resets the file in the staging area to be the same as the HEAD commit. It does not discard file changes from the working directory; it just removes them from the staging area.
$ git reset HEAD filename- works by using the first 7 characters of the SHA of a previous commit.
$ git reset SHAMerge Conflicts
Collaborators working separately on the same paragraph of a file may easily encounter conflicts. In such situations, the command git pull will not merge changes from the remote into your local repository automatically due to the conflict. You are expected to something like this in the shell:
git pull
remote: Counting objects: 3, done.
remote: Total 3 (delta 0), reused 0 (delta 0)
Unpacking objects: 100% (3/3), done.
From https://github.com/your-user-name/repo-name
   9b02654..0462f26  master     -> origin/master
Auto-merging README.md
CONFLICT (content): Merge conflict in README.md
Automatic merge failed; fix conflicts and then commit the result.
If you check the status by git status, you would be told that you have unmerged paths:
git status
On branch master
Your branch and 'origin/master' have diverged,
and have 1 and 1 different commits each, respectively.
  (use "git pull" to merge the remote branch into yours)
You have unmerged paths.
  (fix conflicts and run "git commit")
  (use "git merge --abort" to abort the merge)

Unmerged paths:
  (use "git add <file>..." to mark resolution)

        both modified:   README.md

no changes added to commit (use "git add" and/or "git commit -a")
To resolve the conflicts, we simply use a text editor, say Sublime Text 3, Atom or Visual Studio Code, to open the file with conflicts. In the illustrative example, it is the README.md file.
# Conflict-Resolving

<<<<<<< HEAD
Local changes.
=======
Remote changes.
>>>>>>> 0462f26ddfe83c35424168c2d7a0bed62c653413
You can see conflicts indicated by Git. The content between <<<<<<< HEAD and ======= is on HEAD and content between ======= and >>>>>>> is from the commit 0462f26.
<<<<<<< HEAD- Indicates the start of the merge conflict=======- Indicates the break point used for comparison
>>>>>>> <commit-hash>- Indicates the end of the conflicted lines
To resolve the conflicts, you just remove <<<<<<< HEAD, ======= and >>>>>> 0462f26, and keep what you want to keep in the file. Detailed steps:
- Edit the file to keep the content you want
- Delete the conflict markers (
<<<<<<<,=======,>>>>>>>) - Save the file
- Stage the resolved file:
git add README.md - Commit the resolution:
git commit -m "Resolve merge conflict" - Push the changes:
git push
In some cases, the difference between the local branch and the remote branch is significant, or the file with conflicts is of a special format, say Lyx file. It might be cumbersome to resolve all conflicts in the text editor. Another way to resovle conflicts is simply to open two versions of the files and copy and paste new updates and then commit the updated file. It is easy to do so in SourceTree: select the commit -> right click the file -> click Open Selected Version.
In addition, we can resolve conflicts with SourceTree (preferred) or external merge tools, for example KDiff3. For details, it is recommended to refer to the answer on Stack Overflow.
Important Notes
- The person who fixes the merge conflict gets to decide what to keep
- The full commit history is preserved, so collaborators can always recover their changes
- A more elegant solution to merge conflicts is provided by Git branches
Line Endings and Different Operating Systems
The Problem
You may encounter situations where Git highlights differences on seemingly unchanged sentences. This often happens when collaborators use different operating systems.
The issue is that Git evaluates invisible characters at the end of every line:
- Linux and macOS: Line ending is “LF”
- Windows: Line ending is “CRLF”
The Solution
Configure Git to handle line endings automatically:
$ git config --global core.autocrlf input(Windows users: Change input to true)
Branches and Forking
What Are Branches?
Branches are one of Git’s coolest features:
- Safe Experimentation: Take a snapshot of your repo and try new ideas without affecting the main branch
- Feature Development: Work on new features or bug fixes in isolation
- Research Applications: Try robustness checks, revisions, or alternative analyses
- Easy Cleanup: If you’re not happy with changes, just delete the branch
Only merge back to the main branch when you (and collaborators) are 100% satisfied.
Creating Branches in RStudio
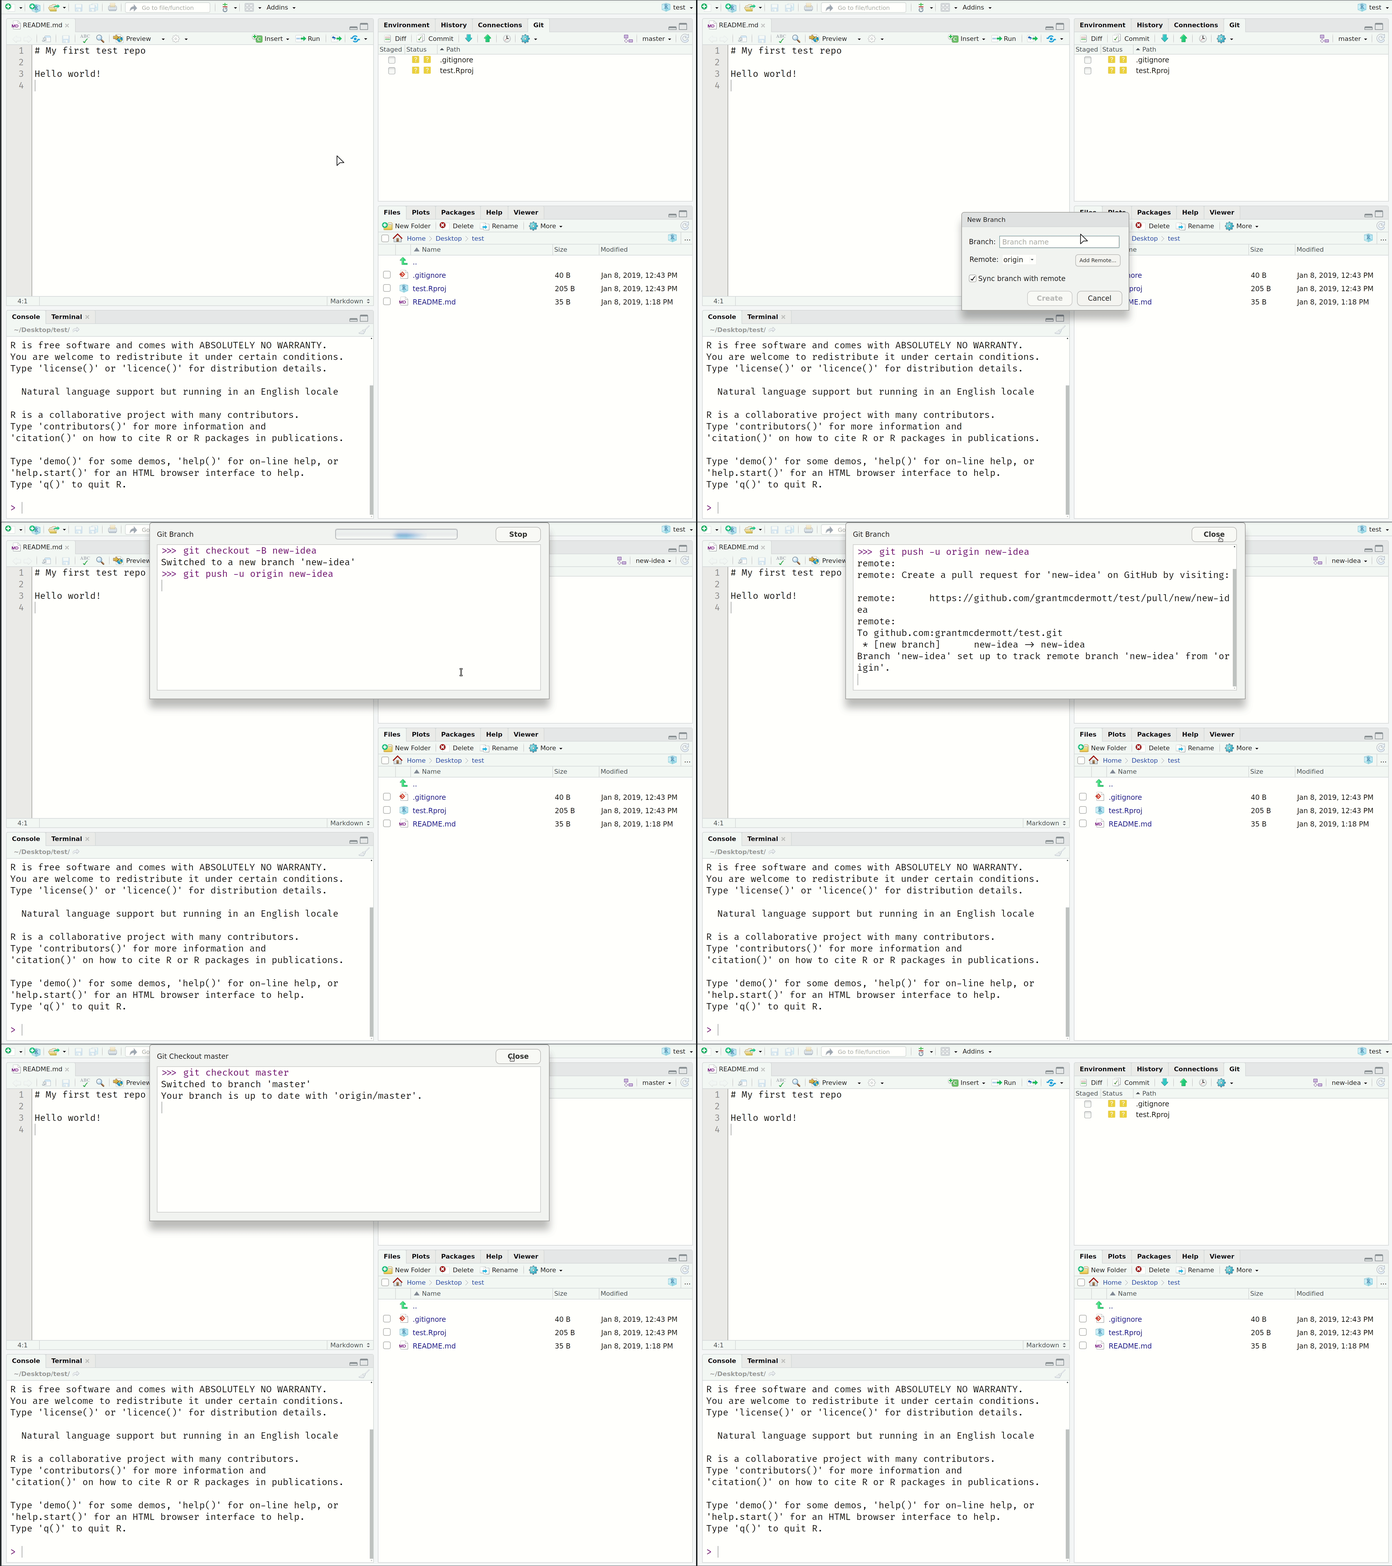
Branch Shell Commands
Create a new branch and switch to it:
$ git checkout -b NAME-OF-YOUR-NEW-BRANCHPush the new branch to GitHub:
$ git push origin NAME-OF-YOUR-NEW-BRANCHList all branches:
$ git branchSwitch back to the master branch:
$ git checkout masterDelete a branch:
$ git branch -d NAME-OF-YOUR-FAILED-BRANCH
$ git push origin :NAME-OF-YOUR-FAILED-BRANCH
Merging Branches
You have two options for merging branches:
1. Local Merging
- Commit your final changes to the new branch
- Switch back to the master branch:
git checkout master - Merge in the new branch:
git merge new-idea - Delete the branch (optional):
git branch -d new-idea
2. Pull Requests on GitHub
Pull requests (PRs) are a way to notify collaborators that you’ve completed a feature:
- Create a summary of all changes in the branch
- Assign reviewers who can approve the changes
- Review and discuss the changes
- Merge the pull request when satisfied
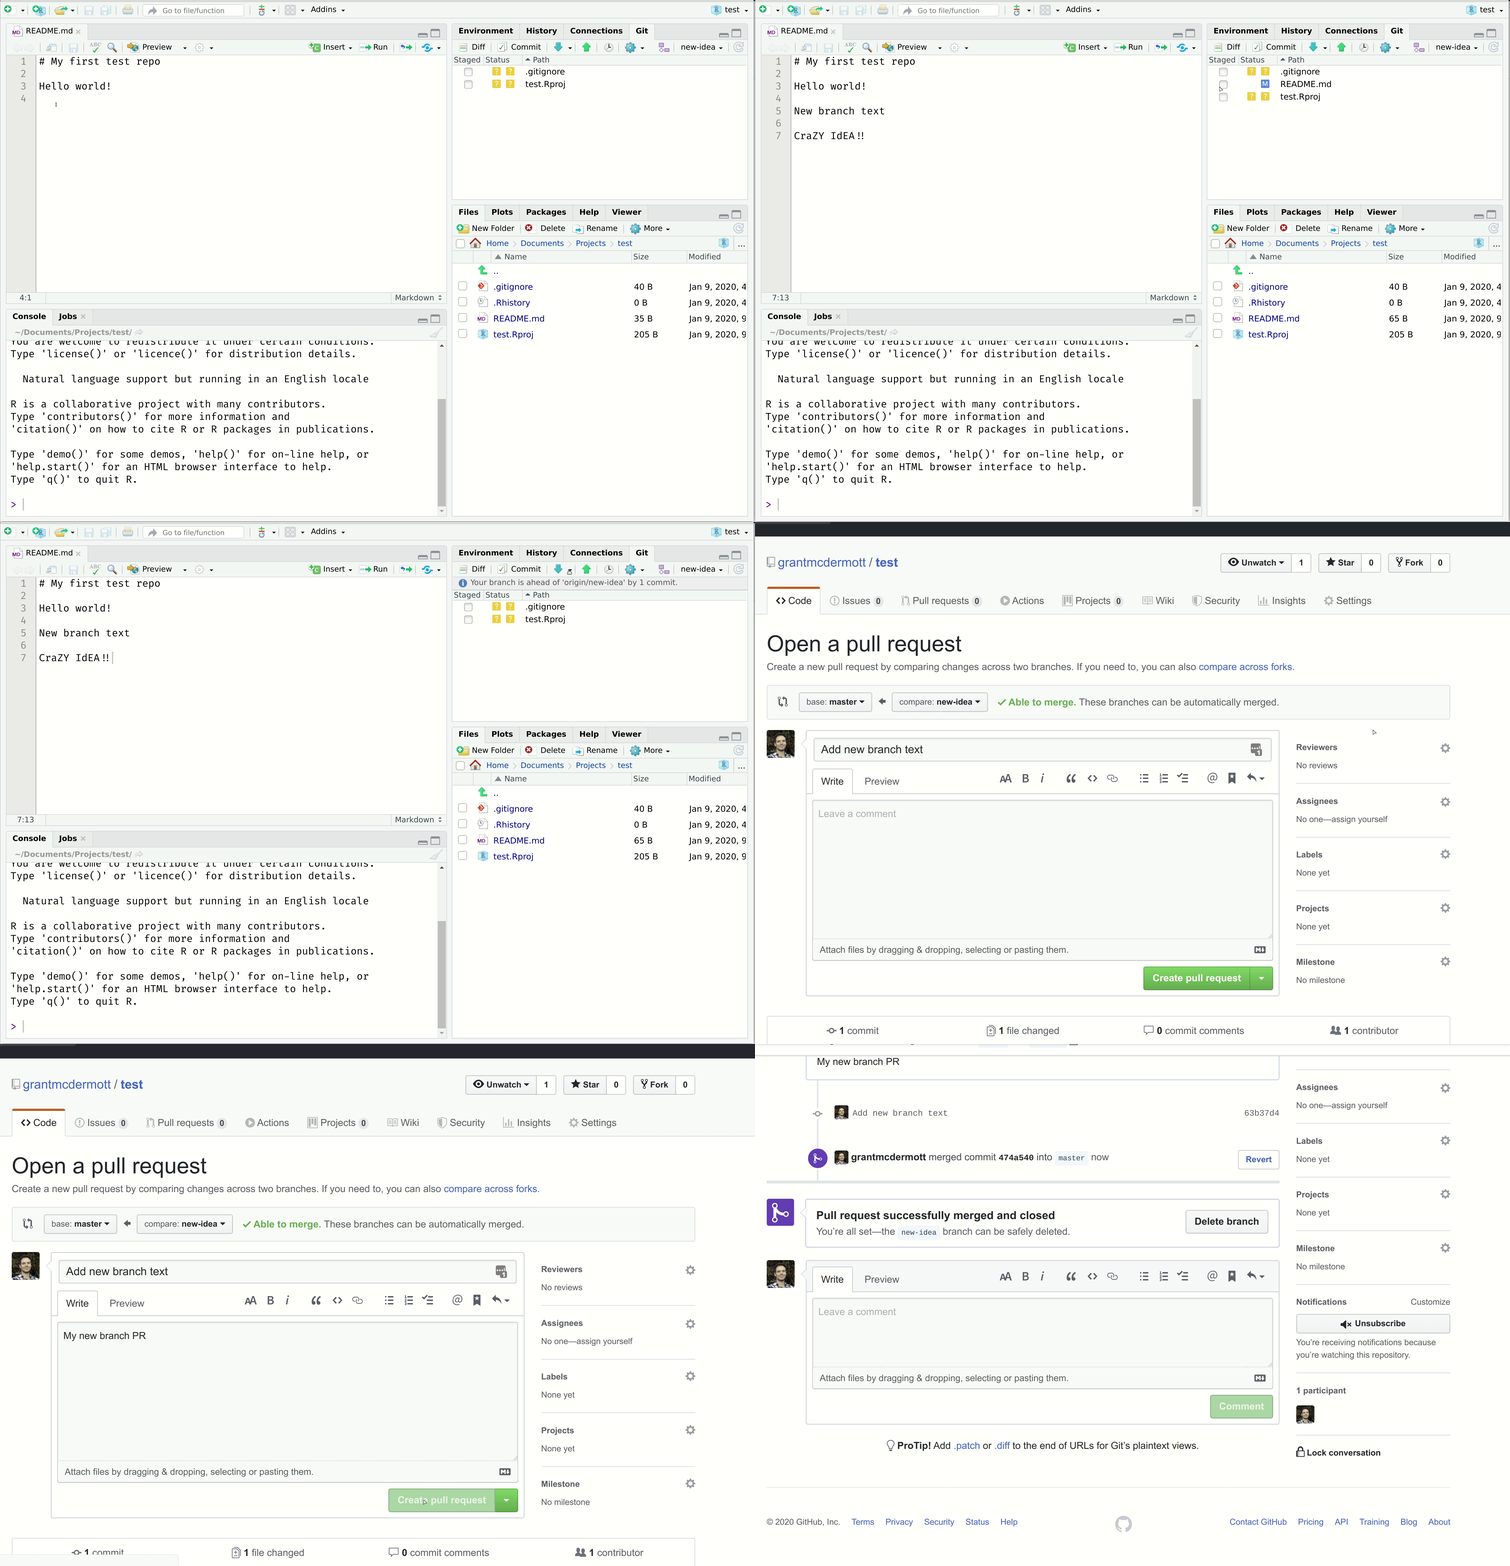
Forks
Git forks lie somewhere between cloning a repo and branching from it. When you fork a repo, you create an independent copy under your GitHub account.
How Forking Works
- Fork a repository by clicking the “Fork” button on GitHub
- Clone your fork to your local machine
- Make changes and push them to your fork
- Create a pull request to the original repository
This is how much of the world’s software is developed: - Outside contributor forks a project - Adds a new feature or fixes a bug - Issues an upstream pull request - Original maintainer reviews and potentially merges the contribution
Maintaining Forks
If you want to stay up to date with the original repository, you’ll need to sync your fork periodically. See GitHub’s guide on Syncing a fork.
Additional Tips and Best Practices
README Files
README files are special in GitHub because they act as repository landing pages:
- Project Documentation: Explain the goal, software requirements, how to run the analysis
- Research Papers: Link to published papers, describe methodology
- Standalone Documentation: Some repos are essentially version-controlled blog posts
- Subdirectory READMEs: Can be added to subdirectories for more detailed documentation
READMEs should be written in Markdown, which GitHub automatically renders.
.gitignore Files
A .gitignore file tells Git what files to ignore. This is especially useful for:
- Proprietary data files (if you plan to make the repo public)
- Large files (>100 MB exceed GitHub’s limits)
- Compiled datasets (focus on the code that produces them)
- System files (OS-specific files, temporary files)
Creating .gitignore Files
You can create a .gitignore file in several ways:
- Automatically generated when cloning with RStudio Project
- Added when creating a repo on GitHub
- Created manually with your text editor
.gitignore Syntax
- Ignore a single file:
FILE-I-WANT-TO-IGNORE.csv - Ignore a whole folder:
FOLDER-NAME/** - Ignore all CSV files:
*.csv - Ignore files beginning with “test”:
test* - Don’t ignore a particular file:
!somefile.txt
GitHub Issues
GitHub Issues are another great way to interact with collaborators and package maintainers:
- Bug reports
- Feature requests
- General questions
- Project management
A sample .gitignore file:
.Rproj.user
.Rhistory
.RData
.Ruserdata
/reference/
/References/
/doc/
/Arc/
*.DS_Store

*ipynb_checkpoints*/
.ipynb_checkpoints/*.*

output_mac*
output_linux*

/DebFm/.vscode/

/*.zip

## LyX
*.lyx~
*.lyx#
*.tmp


## SWP
*.bak
*.aaa

## R
*.Rhistory
*_cache*
*.RData

## matlab
*.asv


## Core latex/pdflatex auxiliary files:
*.aux
*.lof
*.log
*.lot
*.fls
*.out
*.toc
*.gz

## Intermediate documents:
*.dvi
*-converted-to.*
# these rules might exclude image files for figures etc.
# *.ps
# *.eps
# *.pdf

## Bibliography auxiliary files (bibtex/biblatex/biber):
*.bbl
*.bcf
*.blg
*-blx.aux
*-blx.bib
*.brf
*.run.xml


## Build tool auxiliary files:
*.fdb_latexmk
*.synctex
*.synctex.gz
*.synctex.gz(busy)
*.pdfsync

## Auxiliary and intermediate files from other packages:

# algorithms
*.alg
*.loa

# achemso
acs-*.bib

# amsthm
*.thm

# beamer
*.nav
*.snm
*.vrb

#(e)ledmac/(e)ledpar
*.end
*.[1-9]
*.[1-9][0-9]
*.[1-9][0-9][0-9]
*.[1-9]R
*.[1-9][0-9]R
*.[1-9][0-9][0-9]R
*.eledsec[1-9]
*.eledsec[1-9]R
*.eledsec[1-9][0-9]
*.eledsec[1-9][0-9]R
*.eledsec[1-9][0-9][0-9]
*.eledsec[1-9][0-9][0-9]R

# glossaries
*.acn
*.acr
*.glg
*.glo
*.gls

# hyperref
*.brf

# knitr
*-concordance.tex
*.tikz
*-tikzDictionary

# listings
*.lol

# makeidx
*.idx
*.ilg
*.ind
*.ist

# minitoc
*.maf
*.mtc
*.mtc0

# minted
*.pyg

# morewrites
*.mw

# nomencl
*.nlo

# sagetex
*.sagetex.sage
*.sagetex.py
*.sagetex.scmd

# sympy
*.sout
*.sympy
sympy-plots-for-*.tex/

# todonotes
*.tdo

# xindy
*.xdy
IVX_paper/ref.bib.sav
IVX_paper/IVX_paper-annotate.pdf
Summary and Best Practices
The Git Workflow Recipe
- Create a repo on GitHub and initialize with a README
- Clone the repo to your local machine (preferably using RStudio Project)
- Stage any changes:
git add -A - Commit your changes:
git commit -m "Helpful message" - Pull from GitHub:
git pull - Fix any merge conflicts (if they occur)
- Push your changes:
git push
Repeat steps 3-7 often, especially steps 3 and 4.
Frequently Asked Questions
When should I commit (and push) changes?
Early and often. It’s not quite as important as saving your work regularly, but it’s a close second. You should certainly push everything that you want your collaborators to see.
Do I need branches if I’m working on a solo project?
You don’t need them, but they offer big advantages in maintaining a sane workflow: - Experiment without any risk to the main project - Compress significant additions into single branches - Use pull requests to review your own work
What’s the difference between cloning and forking a repo?
- Cloning: Directly ties your local version to the original repo
- Forking: Creates a copy on your GitHub account (which you can then clone)
Cloning makes it easier to fetch updates, but forking has advantages for contributing to others’ projects.
What happens when something goes wrong?
Think: “Oh shit, Git!” Seriously, check out ohshitgit.com.
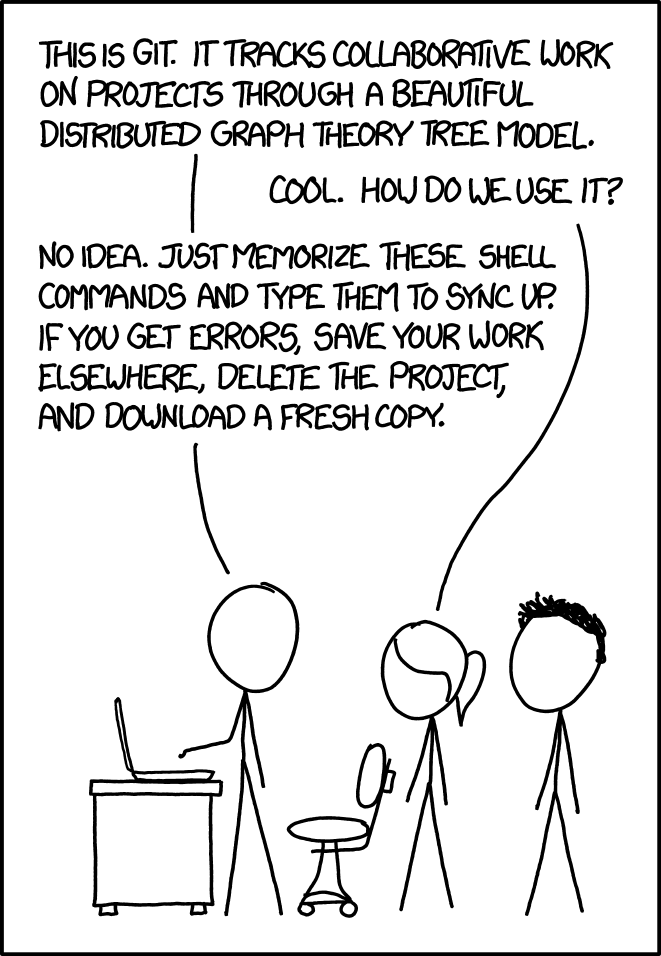
What happens when something goes horribly wrong?
Burn it down and start again. See Happy Git with R’s burn section. This is a great advantage of Git’s distributed nature - if something goes horribly wrong, there’s usually an intact version somewhere else.
Next Steps
Practice
- Create your own test repository on GitHub
- Practice the basic workflow (add, commit, push, pull)
- Try working with branches for experimental features
- Collaborate with a classmate to experience merge conflicts
Resources
- Happy Git with R - Comprehensive guide by Jenny Bryan
- GitHub Guides - Official GitHub documentation
- Pro Git Book - Free online book about Git
- GitHub Desktop - GUI alternative to command line
- Atlassian Online Tutorial This online tutorial is a good starting point to learn the basics of Git.
- The version control module from The Missing Semester of Your CS Education, offered by MIT, is also a great reference for beginners. The online notes is accompanied with a lecture video. Though targeted at computer science majors, this open course is also helpful for econometrics researchers. Modules other than the version control one are also recommended.
- If more elaboration is needed, online courses, Udacity Course and CodeAcademy Course for examples, and other video tutorial are helpful.