ECON 4370 / 6370 Computing for Economics
Lecture 4: Version Control with Git
08 September 2026
Overview
- Why version control
- Git and GitHub
- Getting started
- The four operations
- Merge conflicts
- Branches and pull requests
- Housekeeping
Adapted from Grant McDermott’s lecture notes on Git and GitHub.
Why version control
The problem
Anyone who has finished a paper has a folder that looks like this:
analysis.R
analysis_final.R
analysis_final_v2.R
analysis_final_v2_USE_THIS.R
analysis_final_v2_USE_THIS_really.R
Which file is current? What changed between v2 and USE_THIS? If a coauthor edits the wrong copy, can you get the old one back?
What a version control system does
A VCS takes snapshots of a folder. Each snapshot records the whole tree, who made it, when, and why (the commit message).
That lets you answer questions like:
- Who wrote this function?
- When did this line change, and why?
- When did this test stop passing?
You need this even on a solo project. With coauthors it is close to non-negotiable.
Why it is useful
Working alone
- Look at old snapshots without duplicating files
- Keep a log of why a change was made
- Try a risky idea on a branch and throw it away
Working with others
- See exactly what a coauthor changed
- Combine parallel work
- Resolve overlapping edits instead of emailing zip files
Git and GitHub
Git
Git is a distributed version control system:
- Version control: every commit is a snapshot you can return to
- Collaboration: many people can edit the same project
- Backup: clones on other machines are full copies of the history
- History:
git logandgit blametell you what changed, when, and why
Think of Git as Dropbox plus Word’s “Track changes”, rebuilt for code, papers, and data analysis.
For a researcher’s comparison, see Michael Stepner’s Git vs. Dropbox.
GitHub
GitHub is a hosting platform on top of Git:
- Remotes: a copy of the repo in the cloud (
origin) - Collaboration: issues, pull requests, code review
- Discovery: stars, forks, public research code
Just as we do not need an IDE to run R, we do not need GitHub to use Git. GitHub is the shared copy that makes collaboration and backup easy.
Git(Hub) for research
Scientists adopted these tools because they match how research is supposed to work:
- Open science: the paper’s code and data live next to the text
- Journals: reproducibility and data-access policies
- Coauthors: one history, not three inboxes
- Your future self: a record of how the analysis evolved
See Perkel (2016), Nature: “Democratic databases: science on GitHub”.
How we will use Git
This lecture is terminal-first. The same four commands work in a local terminal, on a server, in CI, and inside AI coding tools.
GUIs, if you want them
GUIs are optional wrappers around those commands. These all call Git for you. Use one later if you like; learn the shell commands first.
Desktop apps
Inside an editor
- VS Code / Positron source-control pane
- RStudio’s Git pane
- lazygit (a TUI)
Clicking “Stage” in any of these is git add. If you only click, you cannot debug a failed git pull on a remote server.
Getting started
Prerequisites
Before we start:
☑ A GitHub account
☑ Git itself (git --version should print 2.23 or newer)
☑ A Bash-compatible terminal
Windows: Git for Windows or WSL both work. If git switch is missing, update Git.
Jenny Bryan’s Happy Git with R is still the best install walkthrough for R users, including editor Git panes.
One-time configuration
Tell Git who you are. Do this once per machine:
Use the email attached to your GitHub account, or GitHub’s noreply address, if you do not want your real address in public commits.
Authentication
GitHub no longer accepts account passwords from git. Pick one:
- HTTPS + GitHub CLI: install
ghand rungh auth login - HTTPS + personal access token: GitHub will ask for it instead of a password
- SSH keys: see GitHub’s SSH guide
After that, git clone, git pull, and git push look the same. HTTPS is the least setup for a first repo; SSH is nicer long term.
Mental model: four places
Git is not “the files in this folder”. It is four places, and commands move snapshots between them.
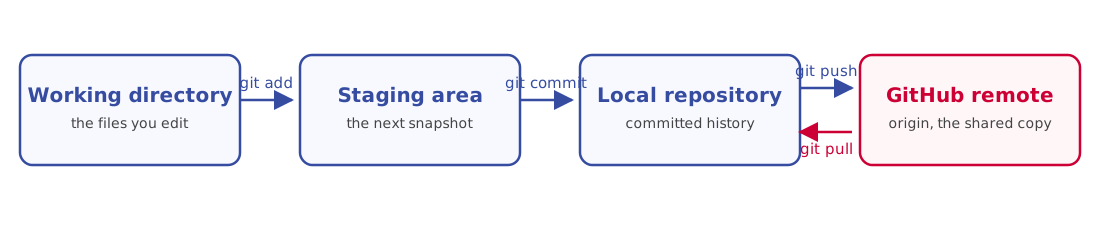
origin is just the conventional name for “the GitHub copy”.
What lives where
- Working directory: ordinary files. Edit these with any editor.
- Staging area (the index): the exact set of changes that the next commit will store. You build it with
git add. - Local repository (the
.git/directory): the database of commits. This is Git. - Remote (
origin): another complete copy, usually on GitHub.
git status is how you ask “where is my work right now?”
Create the repo on GitHub first
Start on GitHub so origin already exists and every laptop is downstream of it.
- Open github.com/new
- Name the repository (e.g.
gdp-nowcast) - Public or private
- Tick Add a README file
- Create repository
- Click the green Code button and copy the HTTPS or SSH URL
Creating the repo on GitHub first is the whole trick. Local clones then have somewhere to git pull from and git push to.
Clone it in the terminal
$ git clone https://github.com/ada/gdp-nowcast.git
Cloning into 'gdp-nowcast'...
remote: Enumerating objects: 3, done.
Receiving objects: 100% (3/3), done.

$ cd gdp-nowcast
$ ls -a
.  ..  .git  README.md
.git/ is the local repository. Everything else is the working directory. Do not edit files inside .git/.
The four operations
Add, commit, pull, push
Once the clone exists, almost all daily work is four operations:
- Stage (
git add) — choose which changes belong in the next snapshot - Commit (
git commit) — record that snapshot in the local history - Pull (
git pull) — bring in new commits from GitHub - Push (
git push) — send your new commits to GitHub
Important
Always pull before you push, even on a solo project. Make it a habit now and you will avoid most “rejected, fetch first” errors later.
Edit a file, then ask git status
Open README.md in any editor, add a line, and save. Git notices:
$ git status
On branch main
Your branch is up to date with 'origin/main'.

Changes not staged for commit:
  (use "git add <file>..." to update what will be committed)
  (use "git restore <file>..." to discard changes in working directory)
    modified:   README.md

no changes added to commit (use "git add" and/or "git commit -a")
Read the hints. git status is the command you run when you are lost.
See the patch with git diff
Lines beginning with + were added; lines with - were removed. This is the unstaged patch: working directory versus staging area.
Stage: git add
$ git add README.md
$ git status
On branch main
Your branch is up to date with 'origin/main'.

Changes to be committed:
  (use "git restore --staged <file>..." to unstage)
    modified:   README.md
The file has moved from “not staged” to “to be committed”. The working-directory copy and the staging area now match.
What to pass to git add
| Command | What it stages |
|---|---|
git add FILE |
that file (or folder) |
git add -A |
all changes in the repo: new, modified, deleted |
git add . |
all changes under the current directory |
git add -u |
modifications and deletions of tracked files only |
From the project root, git add -A is the daily default. git add . is not “new files only”.
Commit: git commit
$ git commit -m "Greet the reader in the README"
[main 35bef63] Greet the reader in the README
 1 file changed, 2 insertions(+)
The staging area is now empty. The snapshot lives in the local repository, and HEAD (where you are) points at 35bef63.
Tip
Write a message that will make sense in six months: what changed and why, not “update” or “fix”.
Inspect history: git log
$ git log --oneline --decorate
35bef63 (HEAD -> main) Greet the reader in the README
929252c (origin/main) Initial commit: add READMEPull, then push
$ git pull
Already up to date.

$ git push
Enumerating objects: 5, done.
Counting objects: 100% (5/5), done.
Writing objects: 100% (3/3), 312 bytes, done.
To https://github.com/ada/gdp-nowcast.git
   929252c..35bef63  main -> main
git pull is git fetch (download new commits) plus git merge (integrate them). Here GitHub had nothing new, so push is a fast-forward.
The daily recipe
Repeat the first two often. Pull and push whenever you want the GitHub copy, or a coauthor’s laptop, to see the work.
Creating the repo on GitHub first means GitHub stays the hub of the network: every laptop is a clone, none is special.
Undo, without rewriting history
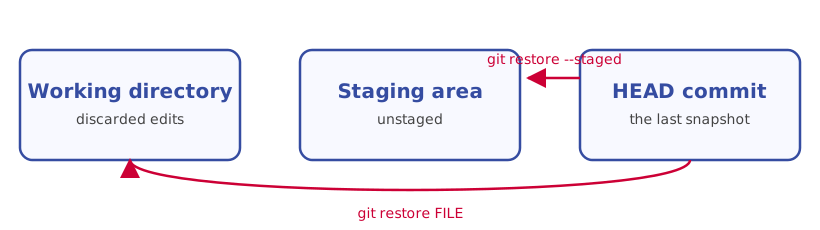
Older recipes use git reset HEAD FILE and git checkout -- FILE. Prefer git restore. It cannot detach HEAD by accident.
Other commands you will meet
Leave git reset --hard and git push --force alone until you can explain what they delete. When something is on fire, ohshitgit.com is more useful than improvising.
Merge conflicts
How two people collide
Ada and Bob both clone main, both edit the same lines of README.md, and both commit. Whoever pushes second is not a fast-forward: the branches have diverged.
$ git pull
From https://github.com/ada/gdp-nowcast
   35bef63..e5f151c  main       -> origin/main
Auto-merging README.md
CONFLICT (content): Merge conflict in README.md
Automatic merge failed; fix conflicts and then commit the result.
Git will not guess. You fix the file, then commit the resolution.
git status during a conflict
$ git status
On branch main
Your branch and 'origin/main' have diverged,
and have 1 and 1 different commits each, respectively.

You have unmerged paths.
  (fix conflicts and run "git commit")
  (use "git merge --abort" to abort the merge)

Unmerged paths:
  (use "git add <file>..." to mark resolution)
    both modified:   README.md
git merge --abort walks away and leaves your branch as it was before git pull.
Conflict markers
Open the file in any text editor. Git has written both versions in place:
# gdp-nowcast

Nowcasting US GDP growth from weekly indicators.

<<<<<<< HEAD
Hello from Ada!
=======
Hello from Bob!
>>>>>>> e5f151c
<<<<<<< HEAD…=======is your commit=======…>>>>>>> e5f151cis their commit
Resolve, then continue
- Edit the file. Keep one side, the other, or a blend
- Delete every
<<<<<<<,=======, and>>>>>>>line - Save
git add README.mdgit commit(Git fills in a “Merge branch …” message)git push
The person who fixes the conflict decides what the file says. The losing lines are still in the other commit if anyone needs them.
Resolving in an editor
VS Code, Positron, and similar editors offer “Accept Current / Incoming / Both”. That is the same edit. You can also copy from git show HEAD:README.md and git show origin/main:README.md.
Line endings across operating systems
Git sometimes reports a diff on a line you did not touch. Collaborators on mixed OS machines are the usual cause:
- Linux and macOS end a line with LF
- Windows ends a line with CRLF
Branches and pull requests
Why branches
A branch is an independent line of commits. Use one to:
- try an idea without touching
main - isolate a robustness check, a referee revision, a refactor
- throw the whole experiment away if it fails (
git branch -d)
Merge back into main only when you (and coauthors) are happy. That is how you avoid “final_final_v2” in the Git era.
A branch is just a pointer
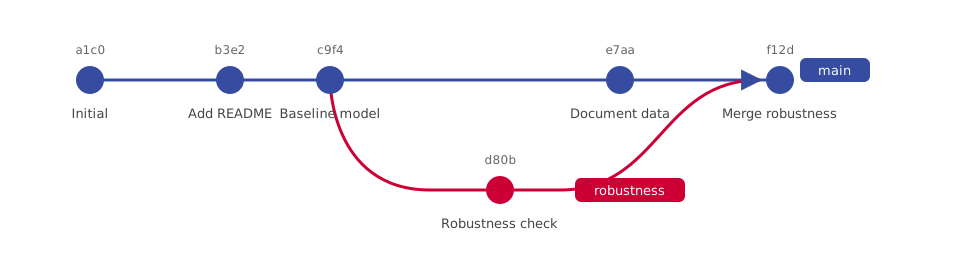
main kept moving while robustness was in flight. The merge commit joins the two histories.
Branch commands
Older material uses git checkout -b robustness and git checkout main. git switch is the dedicated command for branches (Git 2.23+).
Merge locally
If Git can fast-forward, main simply moves. If both sides changed, you get the same conflict machinery as git pull.
Pull requests on GitHub
A pull request (PR) is a proposed merge, with discussion attached.
- Push the branch:
git push -u origin robustness - On GitHub, open a pull request into
main - Summarise what changed and why
- Reviewers comment on the diff
- Merge the PR on GitHub when you are satisfied
PRs are useful on solo projects too: they are a structured review of your own work before it lands on main.
Forks
A clone points at the original GitHub repo. A fork is a copy under your GitHub account, which you then clone.
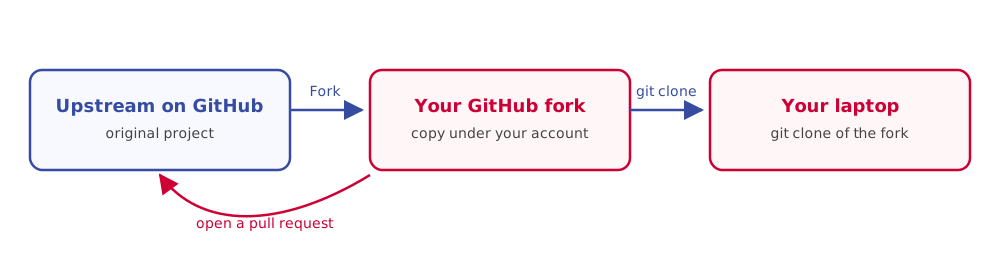
This is how outside contributors send patches to projects they cannot push to.
Housekeeping
README files
GitHub renders README.md as the landing page of the repo. For a research project it should say:
- what the paper / project is
- how to reproduce (software, data, the command that runs the analysis)
- where outputs go
- how to cite it
Markdown in a README is ordinary Markdown. Subfolders can have their own README for extra detail.
.gitignore
A .gitignore file lists paths Git should not track:
- proprietary or confidential data
- files larger than GitHub’s 100 MB limit
- compiled output you can rebuild from code
- editor and OS junk (
.DS_Store,.Rhistory,*_cache/)
Put .gitignore in the repo root and commit it. Untracked files that already match the rules will disappear from git status.
.gitignore syntax
# a single file
secret.csv

# a whole folder
data/raw/**

# a pattern
*.csv
test*

# exception: do not ignore this one
!data/raw/README.md
A starter .gitignore
A short, research-flavoured starter. Commit this file at the repo root.
.Rproj.user
.Rhistory
.RData
*_cache/
.DS_Store
*.aux
*.log
*.bbl
Untrack a file you meant to ignore
.gitignore does not untrack a file that is already committed. Stop tracking it, keep it on disk, then ignore it:
If the secret was ever pushed, rotate it. History still contains the old blob.
GitHub Issues
Issues are the project’s inbox:
- bugs (“the figure on p.12 uses the 2019 sample”)
- tasks (“add the robustness table”)
- questions for coauthors or package maintainers
Close an issue from a commit message with Fixes #12 when you push to the default branch.
Recipe and next steps
The Git workflow recipe
- Create the repo on GitHub with a README
- Clone it:
git clone URL && cd the-repo - Stage:
git add -A - Commit:
git commit -m "Helpful message" - Pull:
git pull - Fix conflicts if Git asks, then commit
- Push:
git push
Repeat 3–7 often, especially 3 and 4.
FAQ
When should I commit?
Early and often. Every coherent change is a good commit. Push whatever coauthors should see.
Do I need branches on a solo paper?
You do not need them. They are still the safe way to try a robustness check, and a self-PR is a cheap review.
Clone or fork?
Clone when you can push to the repo (your paper, your lab). Fork when you want to contribute to someone else’s project.
When things go wrong
ohshitgit.com covers the common panics (“I committed to the wrong branch”, “I need to undo a commit”).
When things go horribly wrong: copy any files you still need, delete the local clone, and clone a fresh copy from GitHub. That is a feature of a distributed VCS: somewhere else there is still a good copy.
See also Happy Git with R’s burn it down section.
When all else fails
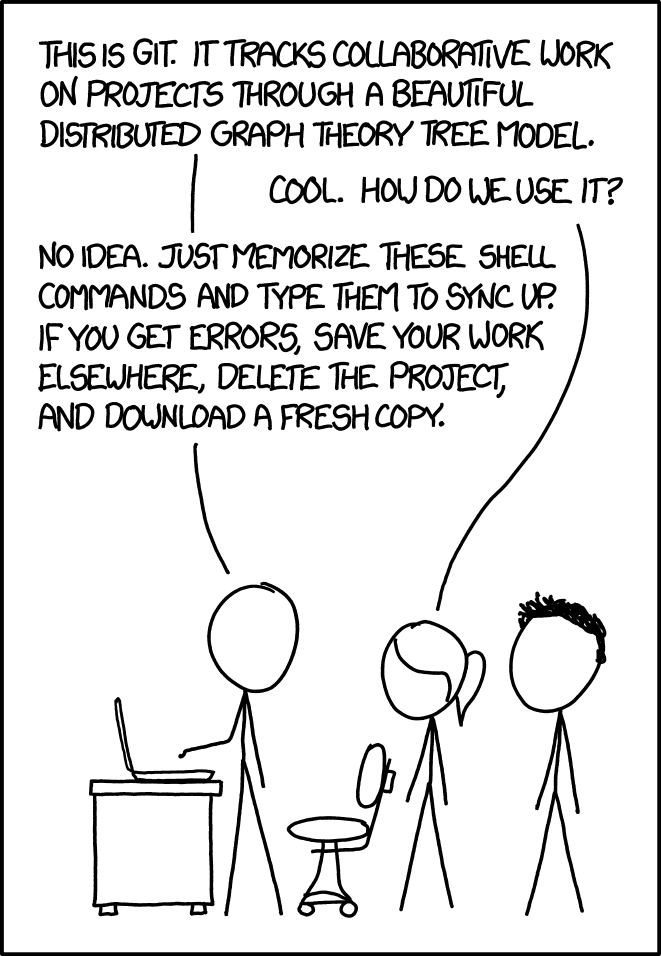
Randall Munroe, XKCD 1597, CC BY-NC 2.5.
Practice this week
- Create a throwaway repo on GitHub with a README
- Clone it, edit the README, run the add / commit / pull / push loop
- Create a branch, make a second change, merge it (locally or with a PR)
- Pair with a classmate on the same repo until you hit a merge conflict, then resolve it
Resources
- Pro Git (free book)
- Happy Git with R (Jenny Bryan)
- Missing Semester, Version Control (video)
- GitHub Guides
- Atlassian Git tutorials
- ohshitgit.com
The Missing Semester notes are aimed at CS students and are still the clearest short treatment of Git’s data model. The rest of that course is worth skimming too.